


Resources to Get Started Teaching in Blackboard
BCM Educational Technologists are available to offer individual or group training on any topics related to Blackboard and associated academic tools.
- Workshops & Training
- Blackboard Guidelines
- Blackboard Essentials
- Ed-Tech Support
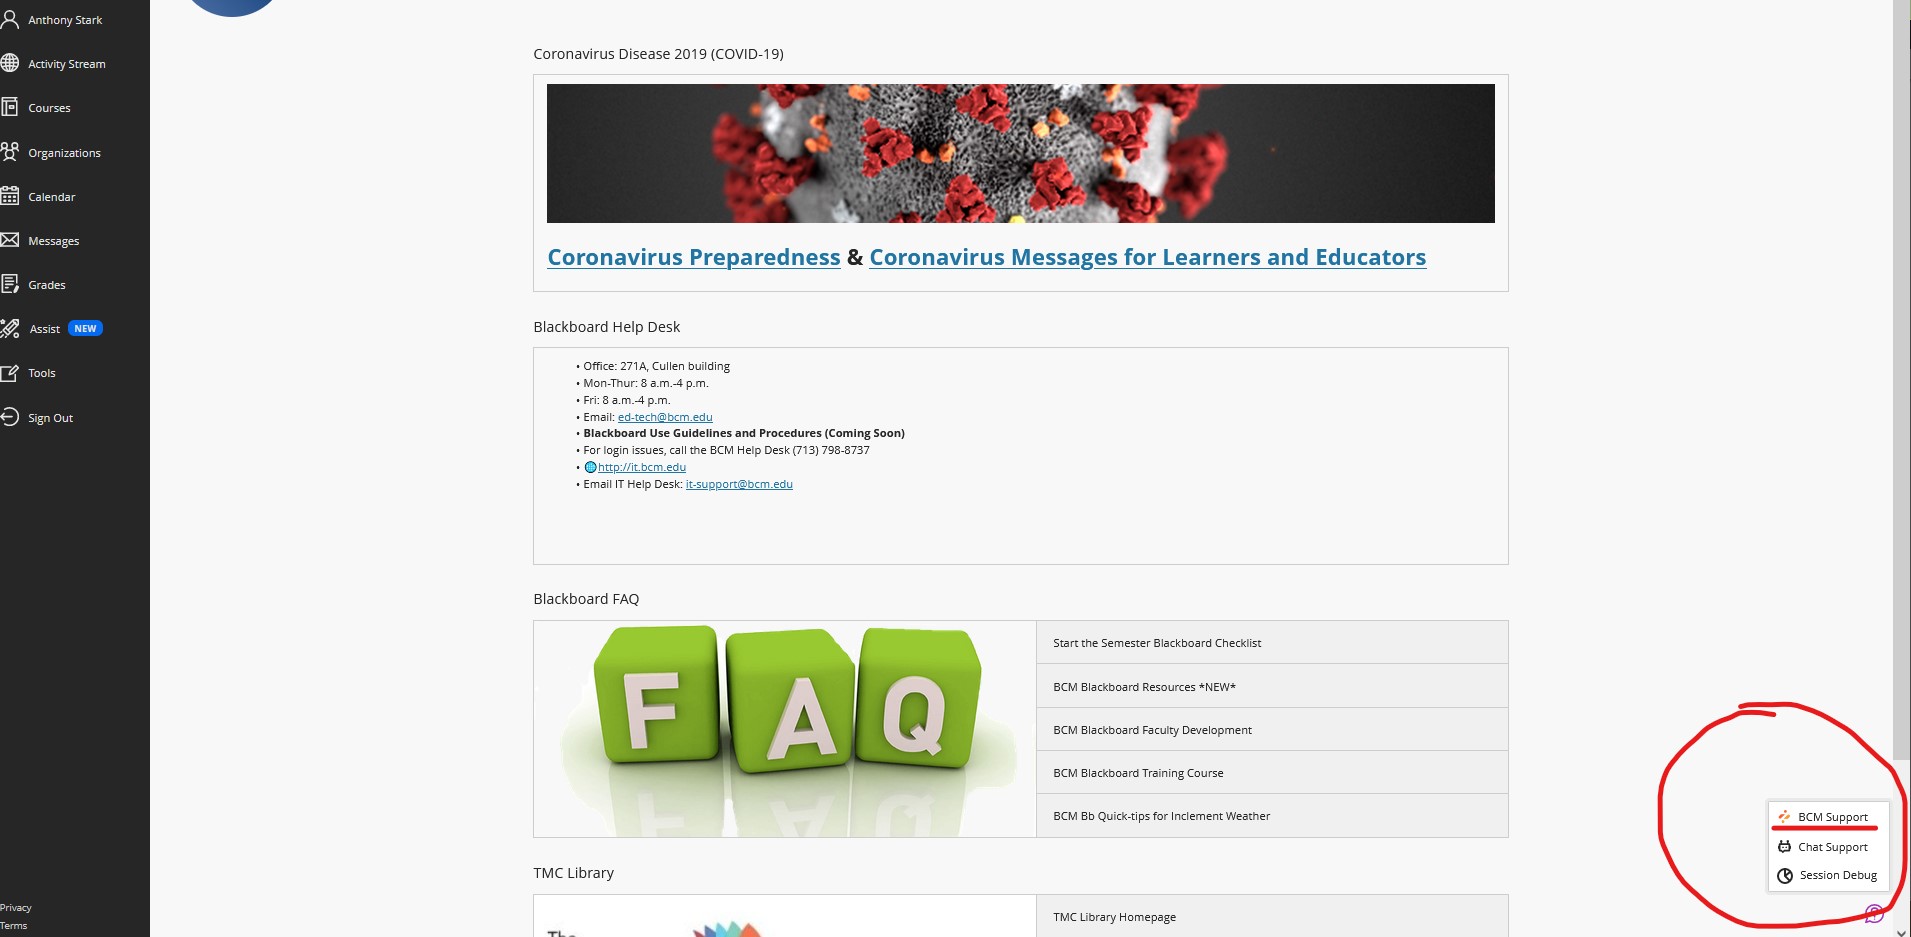
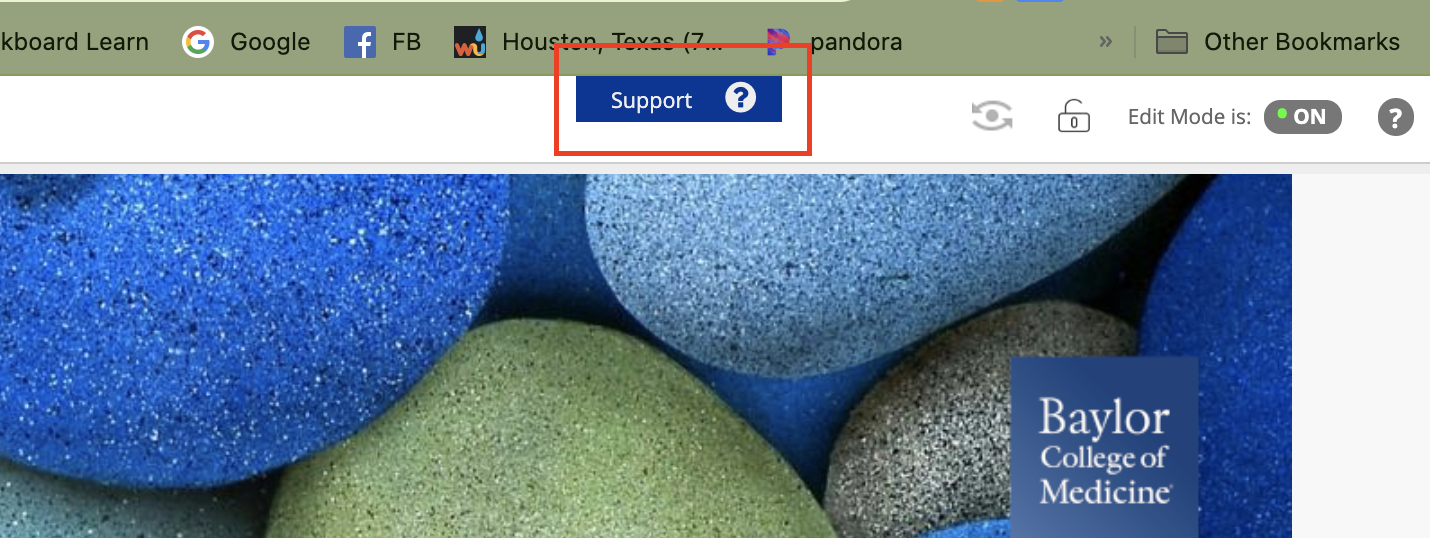
- BCM Blackboard Support Center: accessible outside of a course [screenshot] or within a course [screenshot]
Coaching and Consultations
Visit the Coaching and Consultations page to view information on meeting with a BCM Instructional Designers to receive customized, one-on-one Blackboard assistance based on your needs.
Contact Ed-Tech regarding Blackboard questions, issues, or suggestions.
There are only a few criteria to have a course created at BCM:
- All students must have a BCM username and password (per our license agreement with Blackboard)
- The Blackboard Admin must be aware of the number of users enrolled in the course (there is a student limit with our current license)
- A consultation with the Instructional Designers can be set up prior to course creation. Visit their website. Questions for eLearning can be send by email.
- Submit a New Course/Organization Shell Request Form
- Submit a Batch Enroll Request Form. (see the entry below for reference: Getting accounts created in Blackboard (Batch Enroll Info).)
For more information, visit BCM Blackboard Guidelines.
Most official courses offered by Baylor College of Medicine will have a Course Shell created from a template for that term in the Blackboard System. Each Course Shell is created and assigned a course ID according to the terms in the Blackboard Use above and follows the operations calendar below:
| Fall Courses | Created 120 days before the Fall Terms 1 and 2 | Created on April 1 unless specified |
| Spring Courses | Created 120 days before Spring Terms 3, 4 and 5 | Created on Sept. 1 unless specified |
| Summer Courses | Created 60 days before Summer Term | Created on April 1 unless specified |
Note: Some course shells for cross-listed courses (courses that are listed under two or more schools) are created by the school/system Blackboard Admin following the request of the program director or course director from the primary school listed in CAMS.
- Go to https://bcm.blackboard.com/
- Click on the BCM Users button.
- At the Federated BCM Login page, enter your BCM username and password.
- In the left navigation, click on Courses, then click on the desired course.
- Scroll down to the lower left Control Panel menu to access Course Tools.
- To return to your list of Blackboard courses click the purple "X" near the top left corner of the screen to close the current course.
- To log out, click the Signout button in the left navigation. Click End Session and log out to completely log out of SSO or Continue SSO session.
An Introduction to Blackboard (vBrick video)
- This Introduction to Blackboard is being presented by Edgar Gonzalez, a Client Success Manager with Blackboard. This session will focus on the fundamental skills necessary to successfully host a class on Blackboard. This session is perfect for anyone new to Blackboard.
An Intermediate Blackboard video (vbrick video)
- This Intermediate video is also being presented by Edgar Gonzalez, a Client Success Manager with Blackboard. This session will focus on more advanced skills necessary to be successfully and host a class on Blackboard. This session is perfect for anyone new to Blackboard.
NOTE: If users have issues accessing the video, they need to contact AV at av@bcm.edu. The most common issue is that the users name needs to be added to the faculty list to view the video.
Set Up Courses
Video everywhere is an expectation and the norm.
A quality introduction video shows that you’re prepared and provides a good first impression for your students.
Whether you're just starting the design process or a seasoned online instructor, you can add an engaging introduction video to welcome your students. A short video is an easy way to make a connection with your students.
89 million people in the United States are going to watch 1.2 billion online videos today. The number is expected to double to 1.5 billion in 2016.1
Your introduction video can humanize the online experience for all students, but especially for the more hesitant and new users. You can help students realize that their instructor is a real person with enthusiasm for the subject matter. When you establish a social presence with videos, you build rapport with students and foster a sense of community.
Instructor videos can replicate the face-to-face interactions in the traditional classroom. You can ignite excitement about your course and explain how relevant the content is to them. You can give students a taste of your personality and dispel fears about the online learning environment.
What should I include in an intro video?
Don't overload students with too much information. Short and concise is best. Try to make your videos no longer than three or four minutes. When is the last time you watched an instructional video that was longer than five minutes that held your attention? If you have more to say, record more videos.
- Short and engaging. Remember, you want to motivate your students and not overload them with too much information. Don't discuss specifics or add dates.
- Show your personality. Include a section with photos or clips of your life. What do you do in your free time?
- Follow the rules. Include your expectations for behavior and participation.
- Add notables. Include special instructions or requirements, such as virtual class meetings.
- When are you available? List your availability and communication expectations. Let students know your expected response time for emails and posts, and when grades are available after a deadline.
- Include your virtual office hours. Let them know that questions and concerns are welcomed.
- Help is available. Direct students to available tech support to show that you want everyone to be successful.
- Start here. Show students exactly how to get started in your course.
What doesn't belong in an intro video?
Some information isn't necessary in a welcome video. Add these specific details in the syllabus:
- Course times and meeting places
- All the details of your contact information
- University rules
- Plagiarism and netiquette guidelines
- Grading policies
- Textbooks
- Specific assignment list and important due dates
Tips for success
With a little effort and planning, you can produce a high-quality video. Also, many institutions have video recording studios with teleprompters. You might feel more comfortable reading your script or referring to it as needed. With a full script, you can easily add captions to your video. To make multimedia in your course accessible to people who have disabilities, you must add captions.
- Create a script or detailed outline to help keep your video brief.
- Sit close to the camera-this helps students read your nonverbal cues and facial expressions.
- Make eye contact with your audience by looking into the camera or webcam. Don't concentrate on the script or watch yourself in the computer.
- Check microphone settings.
- Use a plain, light background and wear dark, contrasting clothing with little pattern.
- Add a light in front of you instead of behind you. Your face and background will be crisp and clear. However, if you can use lighting from multiple points in the room, you will look even better.
- Find a quiet place to record where you and your audience won't be distracted.
- Schedule time to practice and film multiple times.
- Speak as you do in class-engaged, with enthusiasm for the subject.
- Add visual aids whenever possible.
1 Abramovich, Giselle. "15 Stats Brands Should Know About Online Video - Digiday." Digiday. N.p., 3 Apr. 2013. Web. 05 May 2014.
Instructors and administrators can upload an image to be the course banner inside courses. The course banner also appears in the grid view of the Courses page of Blackboard's base navigation.
The course banner spans the full width of the screen with the course ID and title. If a course doesn’t have a selected banner, a placeholder image appears at the top. When using brands, this image adopts a hue of the brand color you set, ensuring visual consistency across all courses.
Course banners have many uses:
- Improve the way your Course View landing pages appear
- Provide a visual identity for your course for students who are visual learners
- Bring consistency between what the base navigation displays and the actual course
- Help your students to identify your course and locate course details
Access course banner options
There are three ways to access the course banner options panel.
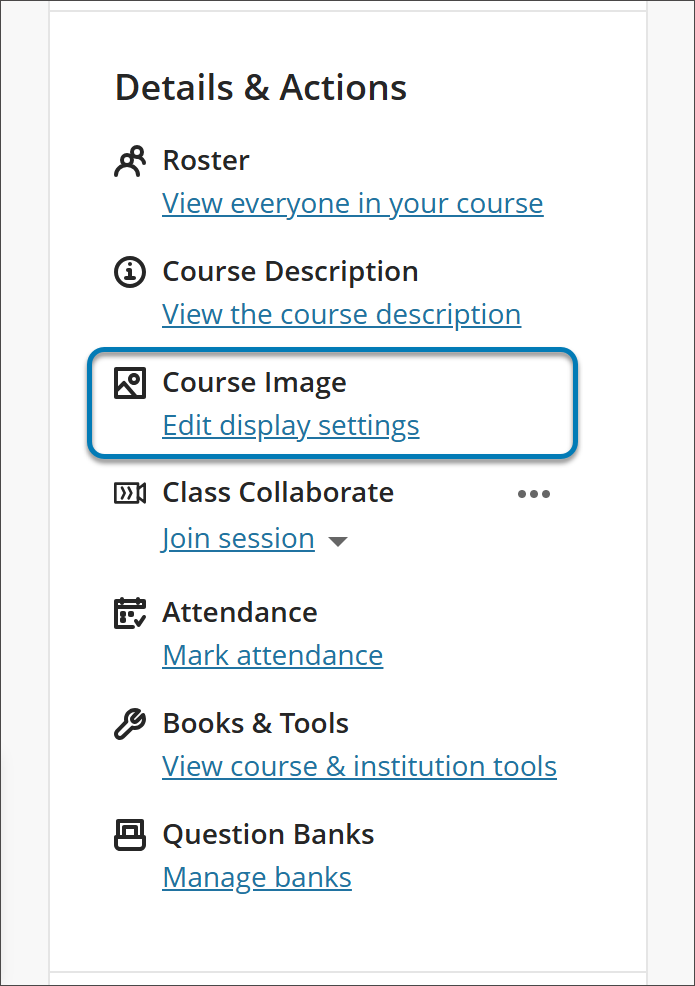
- In your course’s main page, go to Course Image in the Details & Actions menu. (view screenshot)
- In the grid view of Blackboard’s base navigation, hover over the image and select the three dots that appear. You can now select Edit image from the menu. [view screenshot]
- In the main page of your course, select the pencil icon on the banner. [view screenshot]
![view screenshot]](https://cdn.bcm.edu/sites/default/files/img-c7d813650fcd0cc12076e85fd2a6a9d7.png)
- Choose an appealing and meaningful image for your course.
- The minimum size for the banner image is 1200 x 240 pixels.
- Maximum size for images is 10.24 MB.
- Add ideal image ratios should be 5:1
- File Formats: JPG, PNG, GIF
- File Type: Use web-friendly formats like .jpg or .png
- To improve accessibility, we recommend that your banner image not include text, but if banners do contain text, then alt text can be added in the Display settings.
- Images with text don't scale well.
- Keep the main content within the center, at 550 x 150 pixels of a 1200 x 240 pixels banner, to guarantee its visibility. Anything outside that 550 x 150 central pixel area may be cropped out at various screen sizes for either the course card or the banner.
- Abstract images or an image with a focus at the center work better for a banner, due to cropping variability.
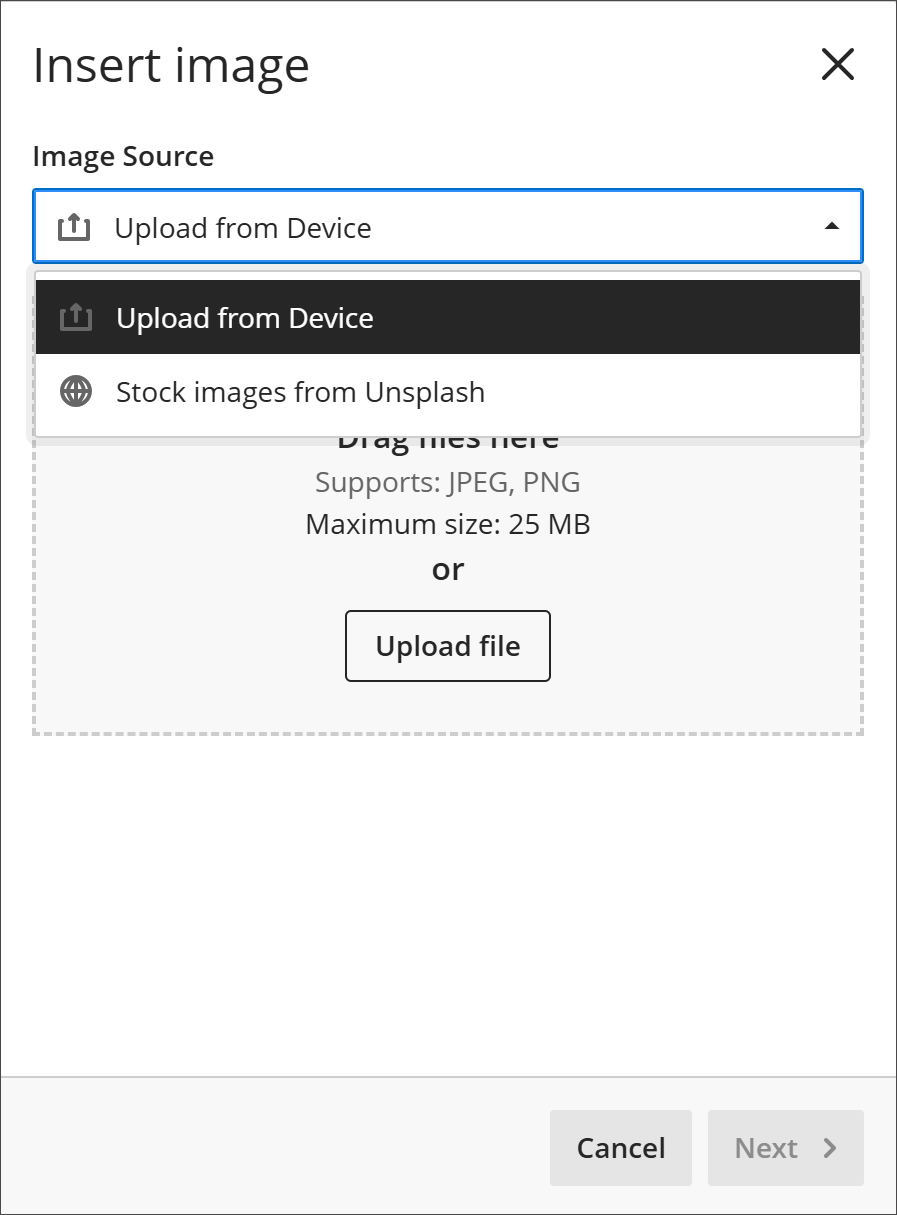
- Select the image icon at the top of the course banner options panel. You can now upload an image. JPEG and PNG formats are supported. [view screenshot]
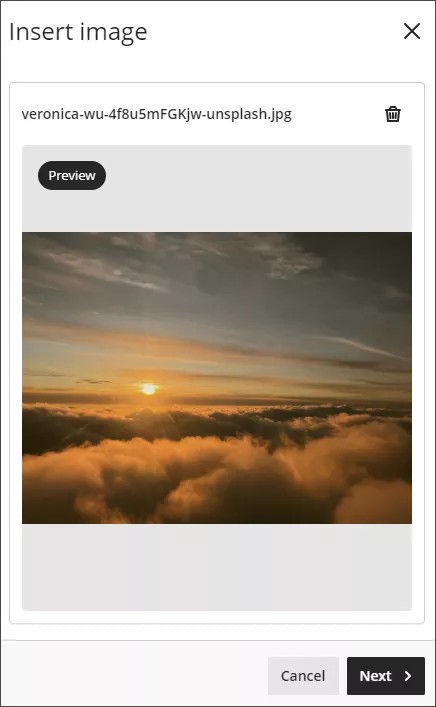
- A preview of the image appears. Select Next to continue. You can select the trash icon if you want to cancel the upload instead. [view screenshot]
- Position the image. You can adjust the zoom of the image using a slider and select and drag what parts of the image become the course banner. Select Save to continue. [view screenshot]
- The image is uploaded to your course. The image might take a few seconds to load, depending on your internet connection. [view screenshot]
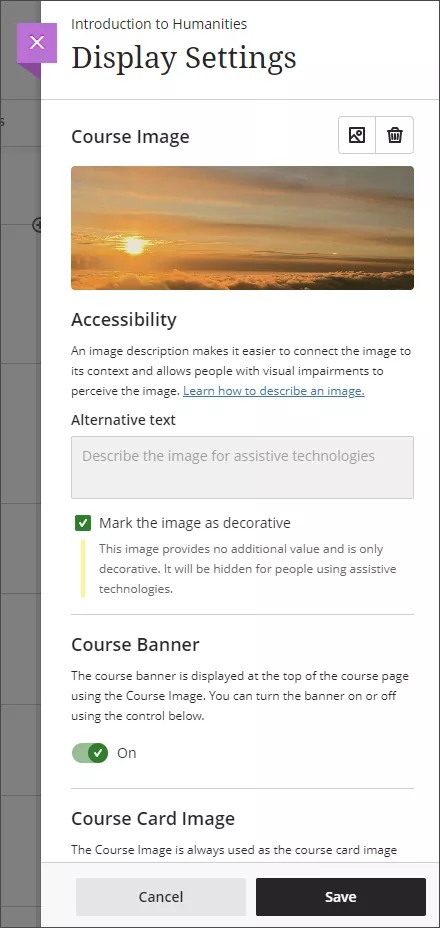
- The course banner is automatically turned on for your course. If you want to turn off the course banner, select the Course Banner slider to turn it off.
- Course banners are automatically marked as decorative, which hides the banner for students using assistive technologies. If you want all students to know the content of the image, deselect Mark the image as decorative. Enter a description of the image in the Alternative text field.
- Select Save to turn the course banner on for your course.
If you want to remove the course banner, select the slider beneath Course Banner in the panel for course banner options. The image will still be available to use for your course.
You can also select the trash icon to remove the image. When you remove the image, your course banner settings return to the default.
Course roles control access to the content and tools within a course. Each user is assigned a role for each course they participate in. For example, a user with a role of Teaching Assistant in one course can have a role of Student in another course.
You set course roles when you enroll users in courses. You can also edit course roles after enrollment.
| Role | Description |
| Course Builder | The Course Builder role has access to most areas of the course. This role is appropriate for an assistant who shouldn't have access to student grades. If the course is unavailable to students, a course builder can still access the course. The course builder can't remove an instructor from a course. |
| Facilitator | The Facilitator role has default privileges related to course materials, gradebook, calendar, announcements, discussions, and groups to assist instructors in the progress of a course. Many institutions use Subject Matter Experts to create content for large, multi-section courses that are facilitated by multiple faculty. These institutions or courses may also require more than one person to help keep the curriculum moving forward. Additionally, institution administrators can grant some or all grading, curriculum set up, and communication permissions to trusted facilitators to help ease these responsibilities in larger courses. |
| Faculty | This is a view only role, much like the student role but no edit access. |
| Grader | The Grader role has limited access to the course. Graders can assist an instructor in the creation, management, delivery, and grading of assessments and surveys. The grader may also assist an instructor with adding manual entries. If a course is unavailable to students, the course appears in the course list for a user with the role of Grader. However, the grader can't enter the course until the course is available. As part of the delegation grading workflow, instructors can assign the ability to reconcile grades to graders. |
| Guest | The Guest role allows prospective students, alumni, and parents to explore Blackboard without making any changes to users, courses, or content. Users with the role of Guest are unauthenticated users. If an administrator has enabled guest access, instructors can make areas within a course accessible to unauthenticated users. Note |
| Instructor | Instructors have full access to the course. This role is generally assigned to the person developing, teaching, or facilitating the class. If a course is unavailable to students, users with the Instructor role may still access it. The instructor is included in the course description in the Course Catalog. The instructor role can control tool availability. |
| Spectator | The Spectator course role gives institutions a flexible, read-only option for course access. Use this role for auditors, observers, or external reviewers who need to review course content without making changes or accessing administrative features. This role supports secure, non-intrusive access to course materials and improves oversight and collaboration. The Spectator role applies at the course level and grants read-only access to all course content. Users with this role cannot edit, delete, grade, or change course settings. The role uses the same permission checks as the Viewer system role but only applies to courses where the user is enrolled as a Spectator. Spectator users do not have access to administrator privileges or system-wide data. Assign the Spectator role from the Role Management page using the course role selector. Administrators manage which courses a Spectator can access and for how long through enrollments. Common uses include:
|
| Student | Student is the default course user role. A user with the role of Student submits coursework and participates in discussions. Students can't create or grade course items. Students see private courses in their course lists, but they can't access them. |
| Student Helper | This is a limited role that gives students the ability to add/remove content. Student Helpers have edit access (not to delete) to the following areas:
|
| Teaching Assistant | Users with the Teaching Assistant role have access to most of the course. If the course is unavailable to students, teaching assistants may still access the course. The teaching assistant isn't included in the course description in the Course Catalog. Teaching assistants can't remove an instructor from a course. |
Course Settings allows you to customize your course to suit your needs and those of your students. Course Settings appears at the top right corner of an Ultra course if the user has privileges to view or manage settings.
Settings include:
- Course Access
- Course Tools
- Student Visibility
- Mastery Gradebook
For complete information on the Course Settings, visit the Blackboard Help Center pages. You can also watch a video on Setting up your Course.
Self-Enrollment
If self-enrollment is enabled by your system administrator, you can allow students to self-enroll in your course.
- From your browser, copy any URL from inside your course.
- Send it as a link within Learn to users you want to enroll in the course.
Link recipients select the link, which leads them to the self-enrollment page. From there, students can join the course by selecting Submit. If the link is sent outside of Learn, the recipient is required to log into Learn.
If an access code is required by the system administrator, send this code with your URL link. A student needs to enter the access code before selecting Submit.
Manage and enroll users
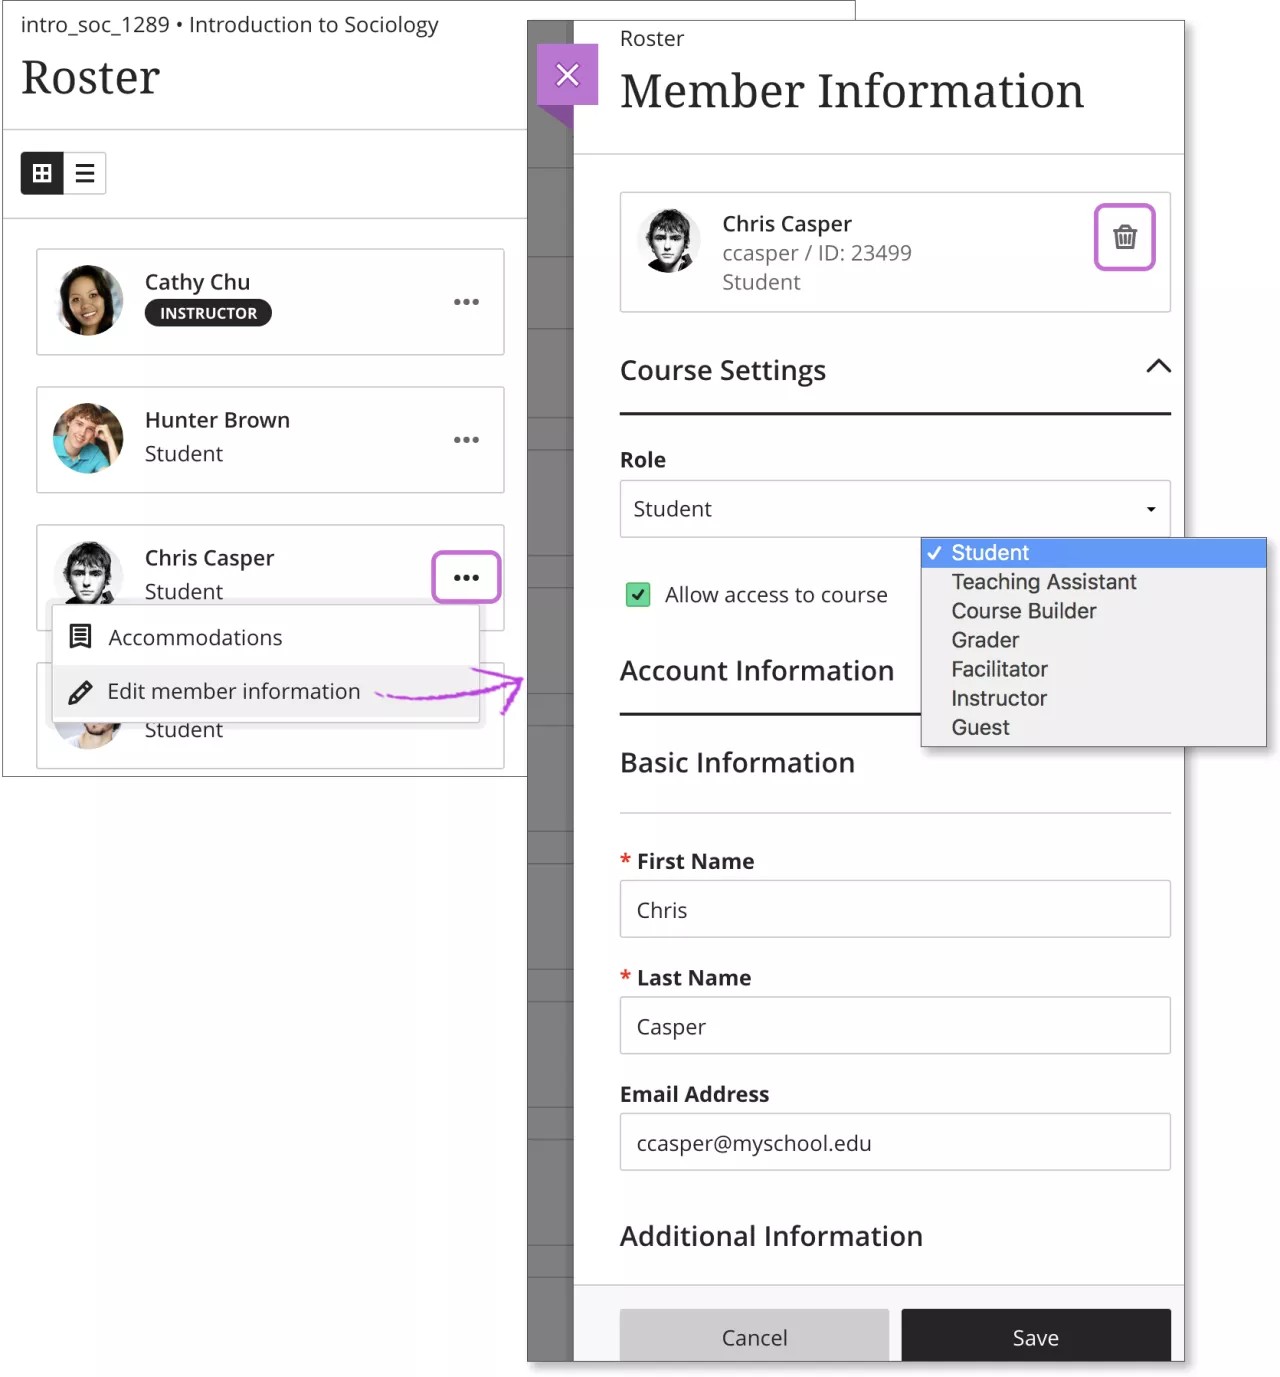
On the Roster page, access a person's menu. Select Edit member information to open the Member Information panel. You can change anyone's role, deny access to your course, or remove a person from your course. Your institution controls what you can do.
In the panel, you can also update your personal information. Your changes are reflected in your profile and throughout the system. Students can edit their information in the same way. [view screenshot]
- Change roles. When you change a person's role, the person is repositioned in the roster list if you're in Grades view. Roles appear in this order: instructors, teaching assistants, graders, course builders, and students. In Gradable Items view, all members appear in alphabetical order.
- Deny access. Clear the check mark for Allow access to course to deny course access yet retain the person's course record and activity. The roster indicates the person's status with a gray profile picture with a diagonal line. The person no longer sees your course on the Courses page.
- Remove people. Select Remove Member to remove a person from your course. This action also deletes all data and grades associated with the person. You'll receive a pop-up confirmation window. To keep the data, you can cancel and deny the person's access to your course instead.
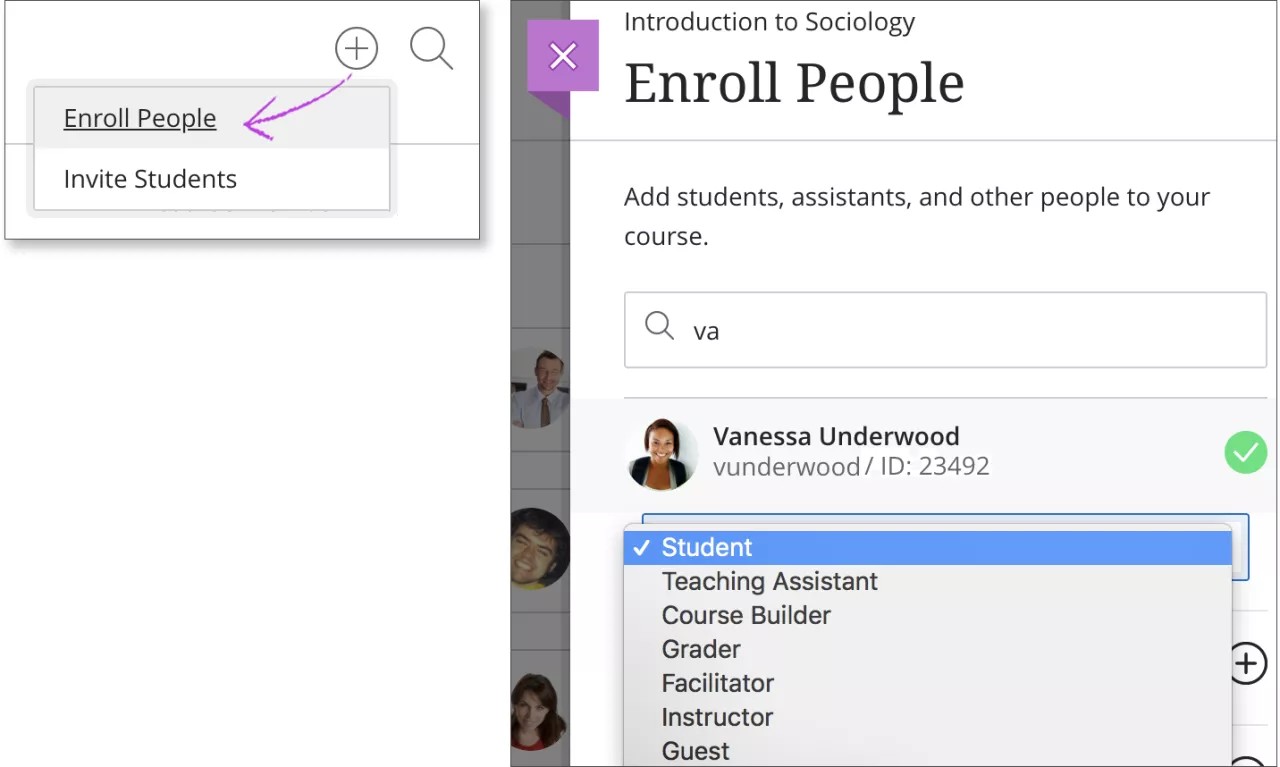
Enroll people
If allowed by your institution, you can enroll people in your course. Select the plus sign button at the top of the roster to open the Enroll People panel. [view screenshot]
- In the search box, enter a name, username, or at least two letters to reveal a list of matches. People already enrolled in your course don't appear in the search results.
- Select one or more people. They immediately appear in the roster list. To reverse a selection, select a person's name again.
- Choose a role for each selected person.
- Select Save. The panel closes. At the bottom of the roster, a message appears with the names of the people you added.
Unavailable users at the system level can't be enrolled in courses and don't show in the search results.
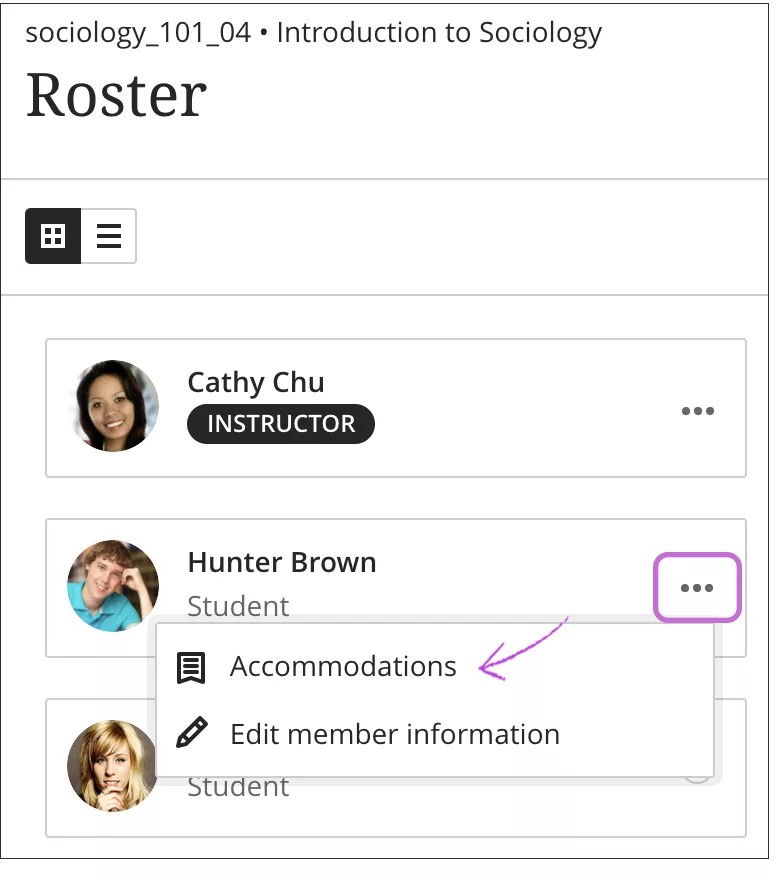
Accommodations
You can set accommodations for individual students and exempt them from requirements, such as assessment due dates or time limits. Use accommodations to help students progress in the course even though they may have difficulty with some requirements. Watch a video about Grant Student Accommodations.
On the Roster page, open a student's menu and select Accommodations. [view screenshot]
In the panel, select the accommodations for this student:
Due date accommodation: Students with this accommodation will never have their work marked late.
Time limit accommodation: Students with a time limit accommodation have more time to finish their work during timed assessments. After you select this accommodation, choose the amount of extra time:
- + 50% extra time
- + 100% extra time
- Unlimited time
A student with the Unlimited time accommodation never sees the time limit for the assessment, reducing the pressure or anxiety that comes with coursework.
You want to be confident that your course is well-designed and functions as you expect—before your students see it. With student preview, you can review the course content from a student's perspective. You can also validate course behaviors. For example, you can review the conditional release of content and how grades appear.
While in student preview, you can do these student activities:
- Submit assignments
- Take tests
- Download and upload files
- Participate in conversations
- Participate in discussions and journals
- Send course messages
- View grades as a student
- Experience group membership
For Complete instructions on the How to use the Student Preview, visit the Blackboard Support Center. Watch a video about Student Preview.